Post by Ela @ GK on Aug 26, 2006 22:39:22 GMT -5
Addball Wings
Brief Introduction
Adding addballs is very simple, and probably the easiest aspect of addballs in general. To begin, you should first get aquainted with one or two terms related to Addballs so that you understand the rest of this lesson.
Base Ball: The ball which the addball is based on. The addball will move along with base ball, so choosing the baseball may make the difference between a nice look hex and a very distorted one in moving.
Inheritance: Inheritance is what causes the addball to gain its default colour, texure, and fuzz. An addball inheriates these properties from its baseball. These properties can be changed later using standard methods.
Now, with those aside, let's begin by adding add balls.
Adding The Base of the Wings
Choose a baseball which you would like to work with. Since this lesson is for creating "Wings" on your pet, we are going to start with the basic wing base: The Chest ball. Right click on this ball, a drop down menu should appear when you right clicked which gives you a number of options. Right now, you want to select the "Add Ball" option.
Upon choosing this option and clicking on it, a new ball will appear. It should appear directly infront of the chest and will be double in mass (size) than the chest. To make things easier to work with, use the "size" tool to decrease the ball so it is dramatically smaller than the chest (about the size of the knee ball). Using the move tool, move the ball backwards and up so that it is about even with the shoulder. You may want to move it to one side a small amount so that you can have a seperate base for each wing.

The diagram above shows the rough placement of the wing base ball. It should be around shoulder distance back and slightly higher then the shoulder. Wing base = orange, Chest = grey, Shoulder = blue/grey. Once you get the first wing's base in the right spot, add another ball to the chest the same way as the first and resize and move that ball so it is on the oposite side as the first base.

Now, you can start constructing the wings!
Constructing Wings : Planning
My method of making anything with addballs can be summed up by "P. S. C.", which can be expanded to "Plan", "Shape", and "Construct". The key to making good wings is to plan them out before you begin adding balls. This way, you can plan out any kinks before hand. It can save a lot fo trouble later on down the line.
To Plan, I usually use MS Paint - Its easy, free, and comes with most any Windows System computer. The "Circle" tool makes planning very easy also, so its all at your convenience. If you wish, you may use other programs like PSP or Arcsoft is you wish. Sometimes the "Layer" option can prove to make things easier once you get into a rut of how to plan.
Once you have your program open, Use the circle tool to draw circles where the balls will go in order to create your wings. The following are examples of wings aflling into three levels: Easy, Medium, and Hard. The grey ball is the wing's base.
EASY WING TEMPLATES

MEDIUM WING TEMPLATES

HARD WING TEMPLATES

Constructing Wings : Shaping
Once you have the planned wing shape done, you can now start adding addballs to form that shape in Pet Workshop, on your breed. Use the method of adding addballs displayed above : Right click on the baseball and select addball - Then move it into place and resize to your liking.
As a personal preference, I like to base all balls which will be used for the wings on the "Wing Base" you added earlier. By right clicking on the Wing base addball, you can choose the option to add an addball onto the already exhisti base of the wing. When ever you add a new addball, make sure theat the 'wing base" is the ball you use to add the addballs.
Once you add the addballs, use the move tool to move them into place. FOr understanding purposes, we will use the first example wing in the "Easy Templates" for explaining throughout the rest of this lesson.
Easy Template 01

As you can see, with the grey ball as the base wing ball, this template requires 3 additional balls to form the shape. Add the three balls and move them so they are in the same general place on the Rendering screen in Pet Workshop:

NOTE: The balls on the rendering are smooth and colours to corespond to the template for easy understanding. You do nto need ot have them any colour in particular nor do you require to have no outline on your wing balls.
See how the template matches up with the rendering screen? An easy way to determin if the wing in Pet Workshop is close to the template shape is the use MS Paint and a screen capture of Pet Workshop (with your file/wings open). Place the template (with white=invisible) over the screen capture, and the balls and circles should line up somewhat. They dont have to be eactly identic since the template is only a 'rough copy'.
If the shape, transulated into Pet Workshop, isnt to your liking, ou can move the balls around now until you get them roughly where you want them. Later, you can make any more movement changes you feel necessary.
Constructing Wings : Constructing
Now that you have the basic shape of the wing finished, you can fill it out by using lines to connect the balls of the wings. You will see on the wing templates I have shown above, the lines which connect the circles on the image. Those lines will help guide where you place the lines on your pet in PWS.
To connect lines, you right click on which ball you want the line to start on. The first ball will give the line its colour (inheritance). In the drop down menu which appears upon right clicking, select "Add Line". Next, right click on the ball you want the line to go to and select "Connect Line". The line will then connect as a segment between start ball and finish ball:

Connect all balls together as you please. You can choose to make a line between all balls, or just select a few balls which you want to connect. Be sure all balls connect to the base of the wing, or else you will end up with an incomplete shape. The following is an example of the same wing displayed above with two different choices for lines connections:
Base to Balls Connections only:

Base to Balls Connections, Additional Connections:

You can do either method of connecting lines on any wing. Play around with different connections to see what you like the most. Like anything, you will over time - through practice and experimenting - figure out your own personal style and method of making wings. Once you are satisfied with where the lines are, you can now move the balls if needed (for better shape/appearance), then start changing the properties to make the wings more attractive and more appealing, as well as much more suiting: Ball Size, Fuzz, Colour, Textures, Outlines, etc.
To make the wings more attractive from the front view, You will need to move the balls around (move them out, either left or right depending on what wing you are working on). For the left wing, move the balls left, away fromt he body - for the right, move the balls right, away form the body. Below is an example of the front view of wings in Pet Workshop. Take note of how the balls at the "top" of the wings are farther left/right than the base of the wings.

Ball Size can make one set of wings look very different just by playing with the size of the addballs used to make the wings. You can try different things until you find a setup you like, but below are the same wings seen above, only with different sized balls through the make of the wings. See how the simple task of changign ball size changes the appearance of the wings so dramatically? (Large image):

Fuzziness can help make a set of wings look soft or rigid. Using the fuzz tool, you can make very fluffy, cuddly 'angel' wings or you can make them look very scraggling, rigid, and fleshing 'dragon' wings. When using fuzz, be sure to add fuzz to the lines connecting the balls too or else you get a patchy look. Using the same sample template as before, here is an example of Fuzzy wings and Smooth wings:
No fuzz (left), Fuzz at 8 (right)

Colour is always helpful in making wings. Once you colour the rest of the pet, you will be able to choose a wing colour which suits the pet. Using my PWS - Beginner - Lesson One, you can learn more about contrasting and complimentary colours so you can inc orperate those into the wings.
With wings, you can choose whether you want to colour the whole wing a single colour, or if you wish to make it two or more colours. Again, the colours you choose depend greatly on the colour of the pet you are working with.
Intermediate Lesson One (1) Assignments
Assignment hints: It is best to avoid using the heavily textured breeds when doing the assignments. The Tabby and the Orange Short Hair are examples of breedz which are difficult to use with the beginner assignments.
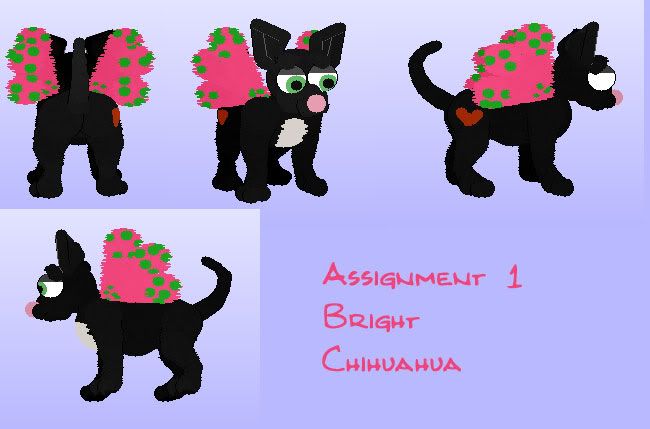
Assignment One (1)
Using what you have learned about wings, create a pet from the original breedz using one of the EASY templates inthe lesson above. Incorperate fuzz and size into the template and alter to you liking but keep the general shape of the template.
Assignment Two (2)
Using what you have learned about wings, create a pet from the original breedz using one of the MEDIUM templates inthe lesson above. Incorperate fuzz and size into the template and alter to you liking but keep the general shape of the template.
Assignment Three (3)
Using what you have learned about wings, create a pet from the original breedz using one of the HARD templates inthe lesson above. Incorperate fuzz and size into the template and alter to you liking but keep the general shape of the template.
Assignment Four (4)
Using what you have learned about wings , create a pet from the original breedz using your own template. For this assignment, you must post a picture of your template used and a picture of your finished product. Incorperate fuzz and size into your pet wings template and alter to you liking, untill satisfied.
Assignment Five (5) EXTRA CREDIT
Using what you have learned about wings , create a pet from the original breedz using any template (provided above, or your own), however, instead of making the base of the wings based off the Chest ball, you are to base them off of the Shoulder balls. The left wing base should be based on the left shoulder and right should be base don the right shoulder. From there, construct the wings as explained above in the lesson. Incorperate fuzz and size into your pet wings template and alter to you liking, untill satisfied. You must Provide pictures of the pet moving in the game (either adopt one and snap pictures or use screen caps in the adoption center).
To submit your completed assignments, post their pictures in reply to this lesson thread. I will then comment, mark and give any necessary hints and tips to help you improve.
NOTES : You can submit your assignments in two fashions, A screen capture in Pet Workshop or as a pet in the game (adopt a pet and take pictures. It is prefered that you take a picture of both sides and one picture form the front (this goes for both methods of submitting your assignment).
INFO REQUIRED: Submitted Assignments shoudl include the Assignment number, three pictures (prefered, but not required), and any questiosn you have concerning the lesson.
Brief Introduction
Adding addballs is very simple, and probably the easiest aspect of addballs in general. To begin, you should first get aquainted with one or two terms related to Addballs so that you understand the rest of this lesson.
Base Ball: The ball which the addball is based on. The addball will move along with base ball, so choosing the baseball may make the difference between a nice look hex and a very distorted one in moving.
Inheritance: Inheritance is what causes the addball to gain its default colour, texure, and fuzz. An addball inheriates these properties from its baseball. These properties can be changed later using standard methods.
Now, with those aside, let's begin by adding add balls.
Adding The Base of the Wings
Choose a baseball which you would like to work with. Since this lesson is for creating "Wings" on your pet, we are going to start with the basic wing base: The Chest ball. Right click on this ball, a drop down menu should appear when you right clicked which gives you a number of options. Right now, you want to select the "Add Ball" option.
Upon choosing this option and clicking on it, a new ball will appear. It should appear directly infront of the chest and will be double in mass (size) than the chest. To make things easier to work with, use the "size" tool to decrease the ball so it is dramatically smaller than the chest (about the size of the knee ball). Using the move tool, move the ball backwards and up so that it is about even with the shoulder. You may want to move it to one side a small amount so that you can have a seperate base for each wing.
The diagram above shows the rough placement of the wing base ball. It should be around shoulder distance back and slightly higher then the shoulder. Wing base = orange, Chest = grey, Shoulder = blue/grey. Once you get the first wing's base in the right spot, add another ball to the chest the same way as the first and resize and move that ball so it is on the oposite side as the first base.
Now, you can start constructing the wings!
Constructing Wings : Planning
My method of making anything with addballs can be summed up by "P. S. C.", which can be expanded to "Plan", "Shape", and "Construct". The key to making good wings is to plan them out before you begin adding balls. This way, you can plan out any kinks before hand. It can save a lot fo trouble later on down the line.
To Plan, I usually use MS Paint - Its easy, free, and comes with most any Windows System computer. The "Circle" tool makes planning very easy also, so its all at your convenience. If you wish, you may use other programs like PSP or Arcsoft is you wish. Sometimes the "Layer" option can prove to make things easier once you get into a rut of how to plan.
Once you have your program open, Use the circle tool to draw circles where the balls will go in order to create your wings. The following are examples of wings aflling into three levels: Easy, Medium, and Hard. The grey ball is the wing's base.
EASY WING TEMPLATES
MEDIUM WING TEMPLATES
HARD WING TEMPLATES
Constructing Wings : Shaping
Once you have the planned wing shape done, you can now start adding addballs to form that shape in Pet Workshop, on your breed. Use the method of adding addballs displayed above : Right click on the baseball and select addball - Then move it into place and resize to your liking.
As a personal preference, I like to base all balls which will be used for the wings on the "Wing Base" you added earlier. By right clicking on the Wing base addball, you can choose the option to add an addball onto the already exhisti base of the wing. When ever you add a new addball, make sure theat the 'wing base" is the ball you use to add the addballs.
Once you add the addballs, use the move tool to move them into place. FOr understanding purposes, we will use the first example wing in the "Easy Templates" for explaining throughout the rest of this lesson.
Easy Template 01
As you can see, with the grey ball as the base wing ball, this template requires 3 additional balls to form the shape. Add the three balls and move them so they are in the same general place on the Rendering screen in Pet Workshop:
NOTE: The balls on the rendering are smooth and colours to corespond to the template for easy understanding. You do nto need ot have them any colour in particular nor do you require to have no outline on your wing balls.
See how the template matches up with the rendering screen? An easy way to determin if the wing in Pet Workshop is close to the template shape is the use MS Paint and a screen capture of Pet Workshop (with your file/wings open). Place the template (with white=invisible) over the screen capture, and the balls and circles should line up somewhat. They dont have to be eactly identic since the template is only a 'rough copy'.
If the shape, transulated into Pet Workshop, isnt to your liking, ou can move the balls around now until you get them roughly where you want them. Later, you can make any more movement changes you feel necessary.
Constructing Wings : Constructing
Now that you have the basic shape of the wing finished, you can fill it out by using lines to connect the balls of the wings. You will see on the wing templates I have shown above, the lines which connect the circles on the image. Those lines will help guide where you place the lines on your pet in PWS.
To connect lines, you right click on which ball you want the line to start on. The first ball will give the line its colour (inheritance). In the drop down menu which appears upon right clicking, select "Add Line". Next, right click on the ball you want the line to go to and select "Connect Line". The line will then connect as a segment between start ball and finish ball:
Connect all balls together as you please. You can choose to make a line between all balls, or just select a few balls which you want to connect. Be sure all balls connect to the base of the wing, or else you will end up with an incomplete shape. The following is an example of the same wing displayed above with two different choices for lines connections:
Base to Balls Connections only:
Base to Balls Connections, Additional Connections:
You can do either method of connecting lines on any wing. Play around with different connections to see what you like the most. Like anything, you will over time - through practice and experimenting - figure out your own personal style and method of making wings. Once you are satisfied with where the lines are, you can now move the balls if needed (for better shape/appearance), then start changing the properties to make the wings more attractive and more appealing, as well as much more suiting: Ball Size, Fuzz, Colour, Textures, Outlines, etc.
To make the wings more attractive from the front view, You will need to move the balls around (move them out, either left or right depending on what wing you are working on). For the left wing, move the balls left, away fromt he body - for the right, move the balls right, away form the body. Below is an example of the front view of wings in Pet Workshop. Take note of how the balls at the "top" of the wings are farther left/right than the base of the wings.
Ball Size can make one set of wings look very different just by playing with the size of the addballs used to make the wings. You can try different things until you find a setup you like, but below are the same wings seen above, only with different sized balls through the make of the wings. See how the simple task of changign ball size changes the appearance of the wings so dramatically? (Large image):
Fuzziness can help make a set of wings look soft or rigid. Using the fuzz tool, you can make very fluffy, cuddly 'angel' wings or you can make them look very scraggling, rigid, and fleshing 'dragon' wings. When using fuzz, be sure to add fuzz to the lines connecting the balls too or else you get a patchy look. Using the same sample template as before, here is an example of Fuzzy wings and Smooth wings:
No fuzz (left), Fuzz at 8 (right)
Colour is always helpful in making wings. Once you colour the rest of the pet, you will be able to choose a wing colour which suits the pet. Using my PWS - Beginner - Lesson One, you can learn more about contrasting and complimentary colours so you can inc orperate those into the wings.
With wings, you can choose whether you want to colour the whole wing a single colour, or if you wish to make it two or more colours. Again, the colours you choose depend greatly on the colour of the pet you are working with.
Intermediate Lesson One (1) Assignments
Assignment hints: It is best to avoid using the heavily textured breeds when doing the assignments. The Tabby and the Orange Short Hair are examples of breedz which are difficult to use with the beginner assignments.
Assignment One (1)
Using what you have learned about wings, create a pet from the original breedz using one of the EASY templates inthe lesson above. Incorperate fuzz and size into the template and alter to you liking but keep the general shape of the template.
Assignment Two (2)
Using what you have learned about wings, create a pet from the original breedz using one of the MEDIUM templates inthe lesson above. Incorperate fuzz and size into the template and alter to you liking but keep the general shape of the template.
Assignment Three (3)
Using what you have learned about wings, create a pet from the original breedz using one of the HARD templates inthe lesson above. Incorperate fuzz and size into the template and alter to you liking but keep the general shape of the template.
Assignment Four (4)
Using what you have learned about wings , create a pet from the original breedz using your own template. For this assignment, you must post a picture of your template used and a picture of your finished product. Incorperate fuzz and size into your pet wings template and alter to you liking, untill satisfied.
Assignment Five (5) EXTRA CREDIT
Using what you have learned about wings , create a pet from the original breedz using any template (provided above, or your own), however, instead of making the base of the wings based off the Chest ball, you are to base them off of the Shoulder balls. The left wing base should be based on the left shoulder and right should be base don the right shoulder. From there, construct the wings as explained above in the lesson. Incorperate fuzz and size into your pet wings template and alter to you liking, untill satisfied. You must Provide pictures of the pet moving in the game (either adopt one and snap pictures or use screen caps in the adoption center).
To submit your completed assignments, post their pictures in reply to this lesson thread. I will then comment, mark and give any necessary hints and tips to help you improve.
NOTES : You can submit your assignments in two fashions, A screen capture in Pet Workshop or as a pet in the game (adopt a pet and take pictures. It is prefered that you take a picture of both sides and one picture form the front (this goes for both methods of submitting your assignment).
INFO REQUIRED: Submitted Assignments shoudl include the Assignment number, three pictures (prefered, but not required), and any questiosn you have concerning the lesson.


 I like how the fuzziness of the wings match the fuzziness of the chest of the pet - It helps the entire thing flow and look brought together. I do suggest, if you choose to only connect a line from the base of the wing to the wing addballs, to place the addballs closer together so you dont get a gap (like between the top addball and the middle addball fo the wing).